


Improve your underwater photography skills with these simple and easy tips.
Last week we learned some valuable tips to help you with underwater videography, this time we are going to dive into some useful tips to improve your underwater photography.
Before we dive into the 5 Tips to improve your underwater photography skills, you can check my Portfolio where I showcase some of my best underwater photos.
Now let’s learn some tips to improve your underwater photography!
1 – Master the Basics
The most important tip is to master the basics.
What do you mean by mastering the Basics? If you want to improve not only your photo but also the whole experience of taking a camera underwater you need to master the basic Diving Skills. Mastering your diving skills won’t only help with your underwater photography but will help also with your whole diving experience.
Good buoyancy skills are usually overlooked, but to be honest I can’t stress enough how important it is to master your buoyancy, especially if you are diving with a camera in your hands. The last thing you want is to disturb the bottom, scare the subject away, or worse, destroy a coral while taking a photo. Mastering your buoyancy skills will help you approach safely to the desired subject, avoid unnecessary backscatter created by stirring up the bottom, and be responsible for damaging the precious coral reefs.
Is it worth the photo when you damage the habitat that you are trying to photograph? I don’t think so. Unfortunately, more often than not, this is the case with many inexperienced divers who want to take on underwater photography before they master the basics.
Mastering your Buoyancy skills will help improve your photography skills by approaching your subjects without scaring them off, making your experience more enjoyable and safer for you and the reefs.
If you are just starting into underwater photography and you live near the sea, I would recommend you to just go out there and get comfortable with your camera, even if you think there isn’t much to see or photograph you will come to realize that there are plenty of opportunities. These practice dives will be of great help later on when you go to dive on the more exciting destinations and will help improve your underwater photography.
2 – Composition
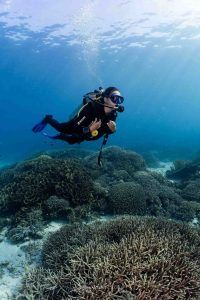
Get low, get close, shoot at an upward angle, don’t cut the subject, and try to fill your frame with the subject.
This is not always easy, but with enough practice, it will come naturally and you will notice a huge difference when you start to frame your photos this way.
Most powerful and easy compositions to learn:
- Get low: This applies to all types of photography, not only underwater, getting low, especially at eye level will help you get more attractive photos when photographing wildlife. It is very different to see a photo of a shark from above than from the front at eye level, both can be very impressive on their own, but the one at eye level will definitely have a bigger impact on the viewer due to the animal looking straight into you.
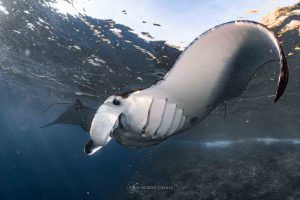
- Don’t cut parts of your subject: Make sure that you give enough room to the subject you are photographing, try to not cut stingray tails or parts of your subjects, since this will make the viewer feel that something is missing. Sometimes is better to shoot a bit wider and then crop in post than shooting too tight and cutting part of the subjects.
- Point slightly up: Try shooting slightly upwards when doing wide-angle photography, this will help make the subjects look a bit larger and more imposing and will help you get those beautiful light rays cutting through the water. Especially when the seas are flat and the sun rays come through, make sure to point your camera slightly upwards to get those juicy light rays on your photos.
- Get close and fill the frame: This can work in both wide-angle and macro photography. But especially in macro, try to get close and fill the frame to enhance the details of your subject, the beauty of macro is to see those rarely seen details of the subjects. Again if you don’t feel comfortable getting too close, you can always add some crop in post.
- Rule of Thirds: This is a classic compositional technique that involves dividing the frame into thirds horizontally and vertically, resulting in a grid of nine equal sections. The key elements of the image are then placed along the grid lines or at the points where the lines intersect. Let’s say that you are photographing a diver, try to frame it on the left or right intersections for a better-balanced photo.
- Backgrounds: Usually overlooked, backgrounds can greatly impact how your photo looks, this is not so easy to get used to as it is something that we usually don’t think about, but with time you will come to realize that moving slightly left or right will completely change the background of your photo making it look way better than you first thought. Try to play with different angles to find a better background for that photo.
A very important thing to help you achieve better composition is to have good buoyancy and good control of your camera. More times than not we will find ourselves close to the reef so we want to make sure our buoyancy and self-awareness are on point to avoid any potential damage to the habitat we are photographing.
Also, it is important to note that we need to be respectful of the animals an give them plenty of space. We do not want to create a situation where they feel threatened or scared by our presence, so do not chase or harass any animal to get the shot, it’s just not worth it.
3 – Understanding Light
Understanding light is crucial for any photographer, and this holds true for underwater photographers as well. Underwater photography poses a unique challenge due to simple physics – essentially the properties of water and its effect on light. Water absorbs light in ways that air does not. Here are several reasons why light is particularly important for underwater photography:
- Colors: Underwater, the absorption and scattering of light can significantly alter the way colors appear. Different wavelengths of light are absorbed at different depths, leading to a loss of color and contrast. As an example, the red color starts disappearing after only 5 meters or 15 feet, that’s the reason why some of the photos come out completely blue or green, due to the rapid loss of color underwater. Understanding how light behaves underwater will help us anticipate and compensate for these changes.
- Backscatter: Proper understanding of light is essential for knowing how to position oneself in relation to the light source to help reduce backscatter (particles in the water that scatter light) and enhance the clarity of the image. This is especially important when shooting with strobes (external flashes) on reduced visibility or on stirred-up sandy bottoms.
- Ambient or artificial light: Light plays a crucial role in shaping the overall composition of an image. It creates shadows, highlights, and contrasts, adding depth and dimension to the scene. Now that you are an underwater photographer, you will have the choice of using ambient light or artificial light (strobes) to emphasize the contours of marine life, the seafloor, and other underwater elements. Depending on the situation you’ll be better off shooting with ambient light, and if that is the case, the best way to get the colors right is to manually white balance before taking the shot.
- Light Positioning: At the beginning, it will be easier to shoot with the sun on your back, as this will give a better light to your subject and will help with the overall image to get an even light. But once you start to get creative you will find that sometimes shooting into the sun and positioning your strobes in different positions will help you improve your photography and enhance your overall creativity.
As you can see understanding light is a very important subject when talking about underwater photography. At the beginning, it will seem very complicated but once you start experimenting you will see that it all makes sense and you will be able to get a different storytelling from the same photo with a different lighting approach.

4 – Focus on the subject
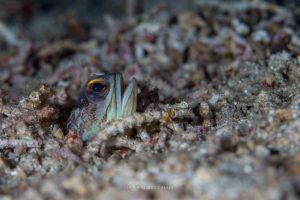
Especially when focusing your photo on a specific subject, you want to make sure that the eyes of the subject are in focus. This is especially true when shooting macro. We want to make sure that the focus point is around the eyes, as this will be the more attractive part of the photo.
When shooting a wide-angle photo, if we go with an f8 aperture or above this will grant that most of the image will be in focus, and most likely the subject included won’t be filling the frame, so focus is not so critical here.
But when filling out the frame with the subject, you want to make sure that your focus point is where it’s supposed to be, there’s nothing more frustrating than taking an incredible image and then seeing that we focused on the front or back end of the fish. Especially if doing a portrait-like photo, this will ruin our idea of the photo. Remember that the eyes of animals are what bring the most attention to the viewers, that is why we want to make sure they are always on focus.
5 – Learning Manual
Learning how to properly shoot in Manual will open plenty of new opportunities to be creative and to take photos as you imagine them.
Of course, sometimes it’s easier to shoot on an Auto or Semi-automatic mode like Aperture Priority, but then you lose the ability to control the complete outcome of the photo. If you never shot Manual mode before, it can be a bit overwhelming at the beginning, but once you learn the basics and get around it, you will see how much your photography can improve.
The issue with Auto modes is that the camera makes its own decision when choosing the parameter for the photo, and although this can be ok when shooting with ambient light, it definitely complicates things when shooting with strobes if you don’t know, or have the ability to, shot on TTL mode.
What works best for me is to go full Manual and make some trial-and-error shots to start with, soon enough you will find specific settings that work best for your style, and you can always work around those. For example for Wide Angle, I usually start at 1/125 shutter speed, F8 aperture, and ISO100 and change settings depending on the situation. For macro, I usually go for 1/250 F18 ISO400 and high power on the strobes. I know that if at the beginning of the dive, I have something incredible coming up I will be able to capture it with these settings.
I hope these 5 Tips to improve your Underwater Photography skills help you improve your photography skills, just remember that rules are made to be broken and that sometimes unconventional techniques will give you better results.
There are still many tips and tricks about this matter so if this is something that you find interesting, let me know in the comments down below and I will make another post about the best tips for underwater photography.
Don’t forget to let me know in the comments which is your preferred skill to use for underwater photography!